With the centre of the quilt finished it was time for the borders.
 |
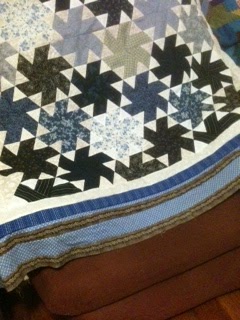
| Borders of the quilt |
The pattern had three borders. The first was a cream border followed by a blue border. The final border was a blue and brown fabric.was a print fabric which in itself looked like another four borders. As I was not able to find a fabric that looked like the one used in the pattern I made up my own.
As I wanted to sew the borders on by hand I decided to use the same English piecing method I had used for the blocks. This meant cutting four 1 1/2 inch strips of cardboard in length long enough for the sides of the quilt.
 |
| Cream & Blue strips |
 |
| The cardboard strips ready for the fabric to be tacked on. |
With the cream and blue borders sewn on it was time to make my final border.
I was pleased to be able to find two pieces of fabric which I could cut into strips to make my own 'patterned border'. I cut the brown fabric into 2.5 inch strips making sure that the 'feathered' pattern was in the centre of each strip. I had to cut the blue fabric into two strips of different widths. The first was 2 1/2 inches and the second strip was 1 inch (allowing for the 1/4 inch seam allowances).
With so many pieces of fabric to be sewn together and the need for accuracy I decided to sew the strips by machine. This was not only more accurate but a lot easier on my hands and finger tips!
 |
| First of four borders sewn |
 |
| Four borders ready to be sewn on the quilt |
This final 5 1/4 inch border was also sewn onto the quilt top by machine. I did this mainly because I did not have enough lager pieces of cardboard to create the templates. I rarely sew my quilts on the machine however I did enjoy machine stitching this border and seeing the quilt top come together so quickly.
 |
| My first proper attempt at a mitred corner |
With the three borders sewn it was time to mitre the corners of the final border. I usually avoid mitred corners as I have always thought they were too hard but in a quilt class last year I had a lesson in mitred corners so decided to put what I learnt into practice.
 |
| Backing fabric for Lachlan's quilt |
 |
Ready for the backing, batting and binding.
. |
Lachlan's quilt is now ready for the batting, binding and quilting. I am planning on hand quilting Lachlan's quilt. I am thinking about shadow quilting around the coloured pieces on each block or possibly quilting around the cream triangles. I haven't really decided yet and will probably change my mind many times before I start
 |
| Charlie giving Lachlan's quilt is stamp of approval. |