Friday, July 27, 2012

The reason I make quilts...

It was lovely to be able to show Lachlan his quilt even though it isn't finished yet.  

I've had quiet a few orders to make quilts over the past few months and I'm still working on quilting hearts on Olivia's quilt so I haven't had time to put this one together yet.

At the beginning of 2012 I had a plan to have all the quilts for my great nieces and nephew finished by Christmas but with getting engaged and now selling my house it's not likely to happen!   I will have to set a new goal but will wait until I am settled in my new house... wherever and whenever that will be!


Tuesday, January 10, 2012

Borders

With the centre of the quilt finished it was time for the borders.
Borders of the quilt

The pattern had three borders. The first was a cream border followed by a blue border. The final border was a blue and brown fabric.was a print fabric which in itself looked like another four borders. As I was not able to find a fabric that looked like the one used in the pattern I made up my own.

As I wanted to sew the borders on by hand I decided to use the same English piecing method I had used for the blocks. This meant cutting four 1 1/2 inch strips of  cardboard in length long enough for the sides of the quilt.

Cream & Blue strips 
The cardboard strips ready for the fabric to be tacked on.

With the cream and blue borders sewn on it was time to make my final border.

I was pleased to be able to find two pieces of fabric which I could cut into strips to make my own 'patterned border'. I cut the brown fabric into 2.5 inch strips making sure that the 'feathered' pattern was in the centre of each strip. I had to cut the blue fabric into two strips of different widths. The first was 2 1/2 inches and the second strip was 1 inch (allowing for the 1/4 inch seam allowances).

With so many pieces of fabric to be sewn together and the need for accuracy I decided to sew the strips by machine. This was not only more accurate but a lot easier on my hands and finger tips!
First of four borders sewn
Four borders ready to be sewn on the quilt
This final 5 1/4 inch border was also sewn onto the quilt top by machine. I did this mainly because I did not have enough lager pieces of cardboard to create the templates. I rarely sew my quilts on the machine however I did enjoy machine stitching this border and seeing the quilt top come together so quickly.

My first proper attempt at a mitred corner

With the three borders sewn it was time to mitre the corners of the final border. I usually avoid mitred corners as I have always thought they were too hard but in a quilt class last year I had a lesson in mitred corners so decided to put what I learnt into practice.

Backing fabric for Lachlan's quilt
Ready for the backing, batting and binding.

.
Lachlan's quilt is now ready for the batting, binding and quilting. I am planning on hand quilting Lachlan's quilt. I am thinking about  shadow quilting around the coloured pieces on each block or possibly quilting around the cream triangles. I haven't really decided yet and will probably change my mind many times before I start
Charlie giving Lachlan's quilt is stamp of approval.

Saturday, January 7, 2012

Lachlan's quilt 12 months on..

Oh dear.... I hadn't realised that I haven't updated Lachlan's quilt blog for over a year. Thankfully the quilt making hasn't been as slow as my blog updating!!!

Lachlan's quilt was my main hand stitching project during the year so it went everywhere with me. Most of it has been sewn in church on Sunday... yes in church during the sermon! Don't be too shocked - there is a reason I sew in church. Since my aneurysm 4 years ago I find it very hard to concentrate when listening to someone talk. I fall asleep which is not a good look in church or in a classroom! I found that by sewing I am able to concentrate on the sermon and stay awake. Not only is the quilt made with lots of love it has lots of God's blessings as well.

Since I have finished the top of Lachlan's quilt instead of showing you that now I will try and update on a few of the things I did and changed with the quilt along the way.

Instead of tacking all of the fabric onto the cardboard templates at the start, I selected six pieces of each of the blues and creams and sewed them into the blocks.

Once the first blocks were sewn I then selected another six pieces of each fabric but this time I needed to place a different cream fabric with the blue pieces. At this time I also sorted the final blue and cream fabrics into groups ensuring that each set of blocks had a different cream fabric.

Paisley block 1 with cream swirl pattern
Paisley block 2 with a different cream pattern


Finished blocks ready to be sewn together
Once the blocks were all sewn it was time to lay the quilt out and sew them together. the biggest challenge was making sure that I didn't place blocks with the same cream patterned fabric together. After a day of laying out and checking pieces I pinned the blocks into rows and started stitching them together.

One of things I changed with making my cardboard templates was to print them on the computer onto card. I traced the templates onto a piece of paper and then photocopied them onto a thick card. This saved so much time compared to drawing the templates onto greeting cards.

Sewing the blocks together was an easy process and with the blocks being 8 inches in diameter it didn't take long before the top was together.

Bag of used templates
As I sewed the quilt together I was able to remove the cardboard templates.  I have kept all of the templates in case I decide to use the same pattern again.


Sewing the edging pieces  


The cream edging pieces were the last pieces sewn onto the top. This gave the quilt a straight edge for the borders.

Saturday, June 12, 2010

Material cut

It has taken me a while but I have finally cut out all of my material ready to be sewn onto the card templates.

For Lachlan's quilt I have chosen 12 different light and dark blue fabrics and 9 different white/cream fabrics.

As I need a total of 216 pieces of fabric for template A I have cut 18 pieces from each of the 12 different blue fabrics.

I need the same number of cream fabrics for template B so I've cut 24 triangles from each color.

Tacking material onto templates.

I use a contrasting or bright color cotton to tack my material onto my card templates. I just find the bright color easy to see when it comes time to take the card out of the blocks. Choose a needle with a sharp point for tacking as this will make pushing the needle through the card much easier.

The most important part of tacking the fabric onto the cards is making sure that you get the corners as firm as you can. This is especially important when tacking the fabric onto the triangles. If the corners aren't firm against the card the pieces will not fit into the block as they should.
Hand stitching allows you some leeway when sewing your pieces together. You can gather or stretch the fabric to fit to some degree but too much of this will make the blocks uneven and they will not fit together as easily.
Back and front of template A


Back and front of template B


Monday, May 3, 2010

Cutting the material

I usually cut all of my material before starting any sewing. As with cutting out templates I like to spend one or two nights tracing and cutting the material ready for tacking onto the templates.

This is just my personal preference so it is up to you whether you cut all your fabric in one go or cut your material as you need it.

Note: All your material should be washed and ironed before cutting it and all tracing of templates is done on the wring side of the fabric.

Using the 'material' template I place it on the wrong material and trace around the edges. I then move the template on the material and trace around it again. I try to be as economical with my fabric as I can by laying the templates side by side in much the same way I did for cutting out the card templates.
The quilt is made up of 36 hexagons each with 6 of both the A and B shapes and 6 half hexagons with 3 of both of the A and B shapes.
When cutting the fabrics I need to make sure that I cut enough of each fabric to make up a hexagon.
I am using 12 different colored blue fabrics and 12 different cream fabrics. I plan to make 3 hexagons from each of the colored blue and cream fabric. In addition I will use 6 of the blue and cream fabrics again to make up the half hexagons.
In total I will need to cut a total 234 pieces of blue fabrics using the A template and the same number of pieces using the cream fabrics for the B template.
Templates C and D are made from the same cream fabric which can be a repeat of any of the fabrics already used on the hexagons.

I have started cutting out my fabrics so once I have cut them all out will start tacking the fabric onto the card templates.

Saturday, May 1, 2010

Templates

Cutting and measuring templates accurately is probably the most tedious but most important part of making a quilt.

I use two types of templates, pattern templates and card templates. The pattern templates are used to trace the card templates and to cut the material to the required shapes and sizes.

Pattern templates can be made from thick cardboard or template plastic. You will need to cut two templates for each shape you require for the quilt. One will be for the base template which will be the size of the piece required as detailed on the pattern. The second will be used for cutting the material. This template will be 1 to 1.5 cm larger.

Note: As I am going to be cutting a lot of card templates I am going to use template plastic for my pattern template. Thick card is also suitable but you might find the template plastic is more durable.


Card templates can be made from any used greeting cards or thick posters. Make sure the card is not to thick as it will be hard to push a needle through it. You can also now buy packets of templates from quilting shops and on eBay.

Requirements:

  • quilt template pattern
  • ruler
  • pencil
  • pile of used greeting cards
  • thick card or template plastic
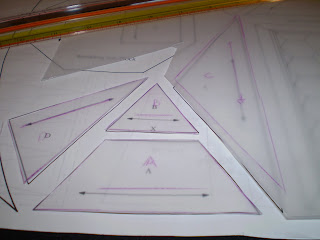
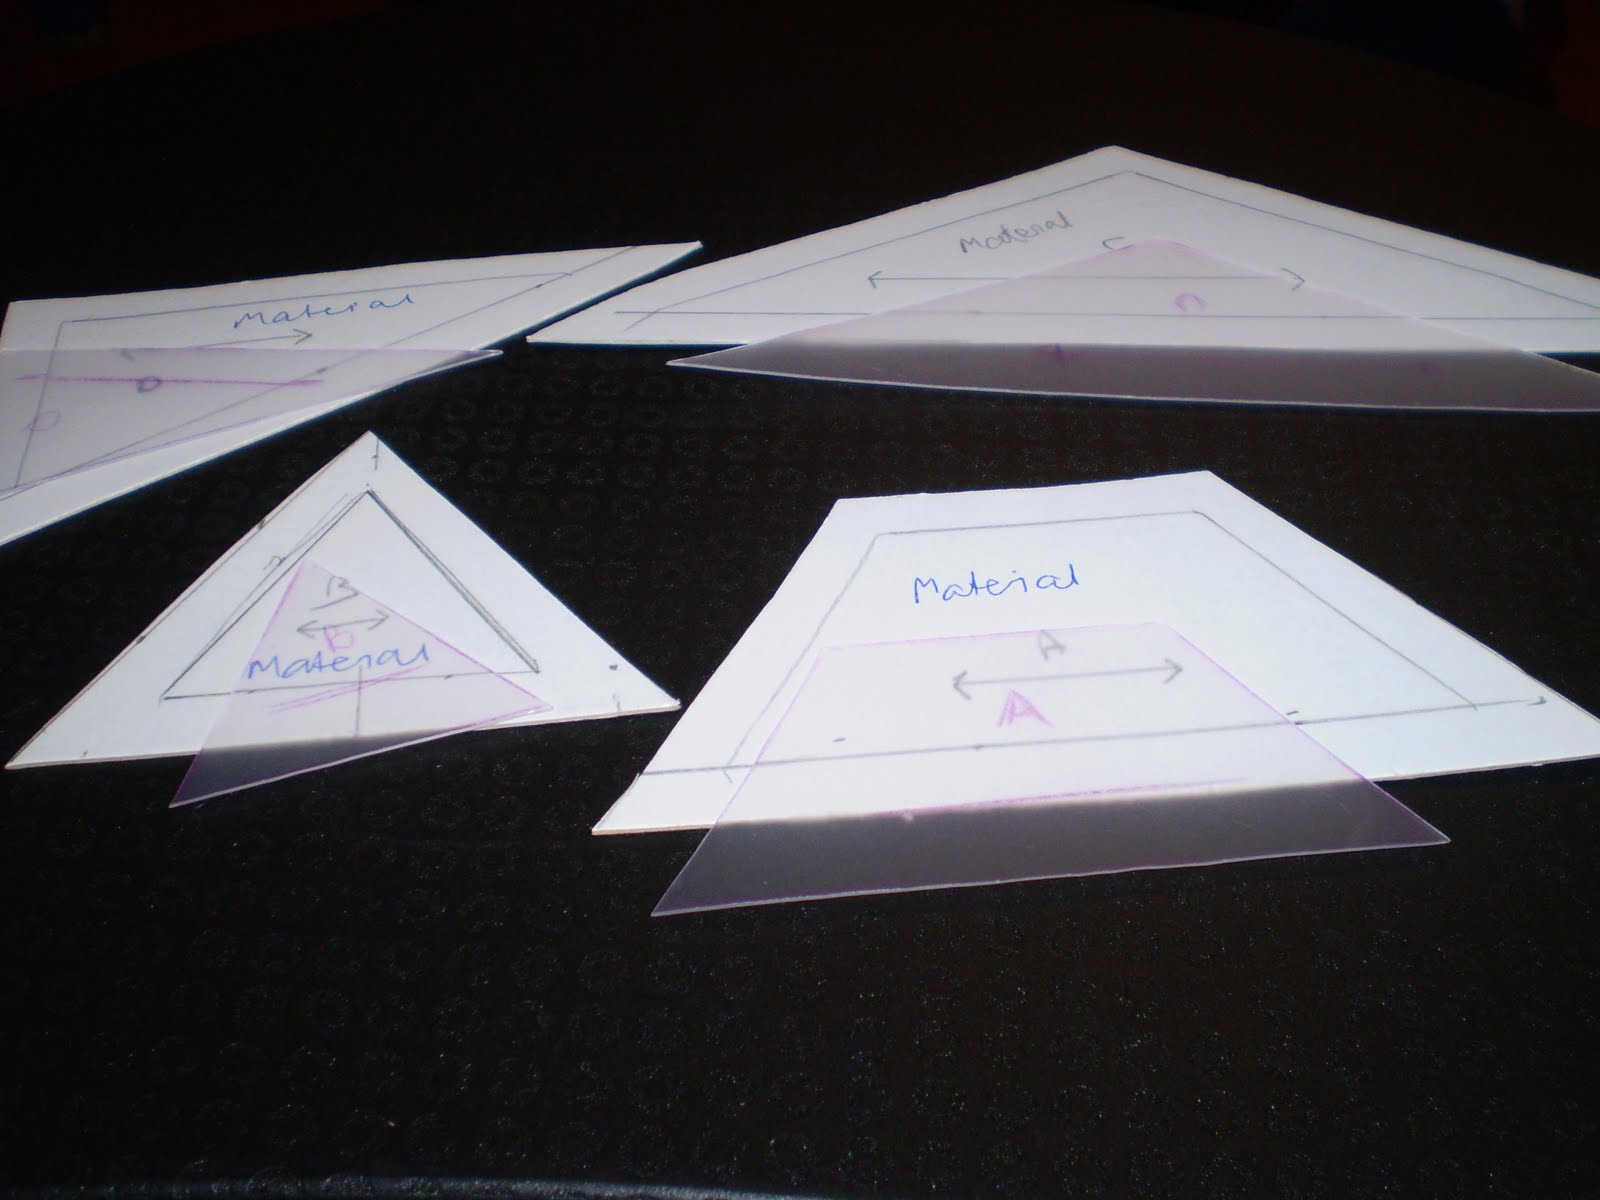
Lachlan's quilt has four pattern pieces. I will be making two templates for each piece. I will use template plastic for the main pieces and a thick card for the templates that will be used to cut the material.

From the pattern I will be using the 4 pieces marked a, b, c, & d


Pattern templates

The easiest way to make your template is to lay the template plastic over the top of the pattern and trace the pattern pieces. Carefully cut the templates out.

Note: Template plastic can be hard to cut as scissors can leave the edge uneven. You can use a roller cutter leaning the blade against a ruler as a guide.


Label your templates and draw any fabric guide lines as detailed on the pattern.

If you are using cardboard you can either measure and draw the template shapes onto the cardboard or you can trace the pattern and lay it on your cardboard.

Use whatever method suits you best. The main thing is that you have pattern templates which are the exact size as the pattern.

Once you have all your pattern templates you can now make the templates for cutting your material.

Material templates

The templates for cutting material do not need to be as exact as the pattern or card templates. I make my templates 1cm larger than the pattern template. This is going to be your seam allowance for each piece.

Most patterns have a slightly smaller seam allowance however I find that 1 cm allows you to have a good turnover of fabric to tack it on to the card.


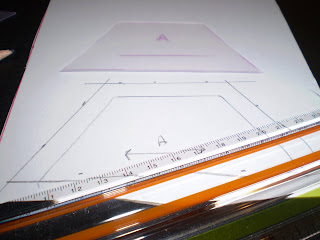
The easiest way to make your material template is to lay the pattern template onto the thick card and trace around the edge.
Using your ruler measure 1 cm around the template. Repeat this process for all templates ensuring that you label all templates and copy any instructions from the pattern.


Card templates

Getting the size of the card templates right is really important as these are the templates used in the quilt. If one template is not cut to the correct size it can affect the whole block or quilt.

Being consistent with the tools you use is the best way to make sure your templates are the same size.

You should try and use the same pencil or pen, ruler, pattern template and scissors. The finer the pen nib or pencil tip the better it will be.

Because we are hand stitching the pieces you can adjust your fabric and stitching where your template might have been a couple of millimeters out in size. As a guide, if a card template is more than 1mm smaller or larger than it should be then I don't use it.

One thing to note is that when you trace around any pattern template the card templates may end up a millimeter or so bigger than the actual pattern size. So long as ALL the card templates are 1mm bigger it will not affect the making of the quilt.

As my small triangle templates are 1mm bigger than the actual Add Imagepattern I now need to make sure the card templates for the other three templates are also 1mm bigger than the actual pattern.


It is up to you how you cut your card templates out. I try and use as much of an old card as I can laying the templates side by side.

Cut the require number of card templates as detailed in the pattern. I prefer to cut out all of my card templates before starting anything else. I find that it usually takes me one or two evenings to draw and cut enough templates from the cards. I keep all of my card templates in a plastic zipper bag ready for use.

For this quilt I need to cut the card templates as follows:
Template A 234
Template B 234
Template C 12
Template D 2

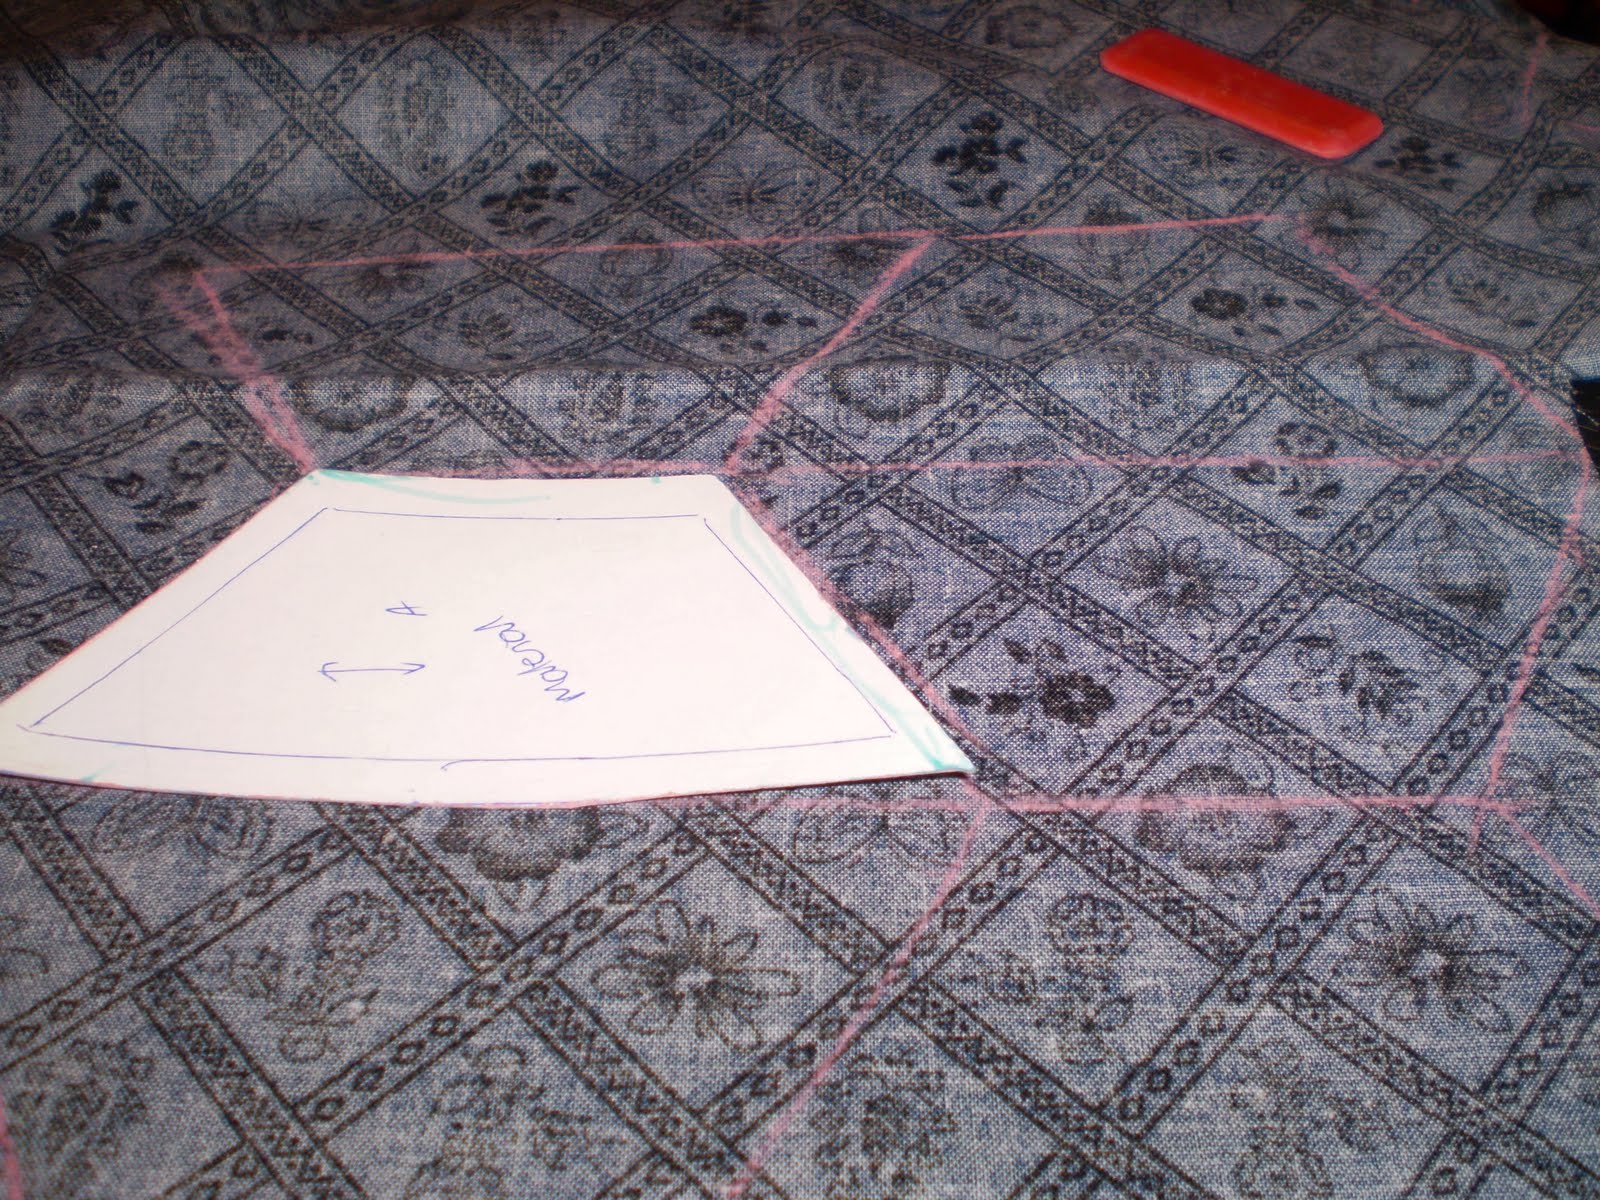
Once you have cut your pattern and card templates your ready to start cutting out the fabric and tacking each piece onto the card.

Spinning Stars pattern

Spinning Stars is a quilt by Lee Robinson. The pattern is one the quilter's projects in the Patchwork & Quilting magazine Yearbook 2001.
Each hexagonal block will measure 10cm (4inches) with the finished quilt measuring 128cm x 152cm (50.5in x 60in).

I've collected the material, some of it new and some from fabrics that I have used in other quilts.
I'm not a good one for reading and following patterns.

I use the diagrams to help me work out how each piece in a block goes together.

I think it's probably more important to follow the pattern when sewing quilts by machine as each piece has to be placed and sewn in order to ensure the pieces fit together.

Tuesday, April 6, 2010

Preparation for Lachlan's quilt - choosing material

I've selected the material for Lachlan's quilt. I already had some pieces of blue fabrics that I wanted to use in this quilt and also a few pieces of cream fabric.

As I didn't have enough I brought some more pieces of both blue and cream toned fabrics for the top.


I couldn't find a 'boarder fabric' to use on the boarder so I have brought four pieces of material to make up a similar design.
I usually leave buying the backing material and batting until I have finished the top of the quilt so that I can make sure I have enough of each. It's also good to be able to see the top completed so that you can match the backing material.

Once I have the material I wash and iron it all.
This is my clothesline full of fabrics for Lachlan's quilt.

Monday, April 5, 2010

A quilt for Lachlan - Preamble


I'm making a quilt for Lachlan and have chosen a pattern called 'Spinning Stars'. The quilt I made for my other great nephew, Jacob was called 'Spinning Circles' so a quilt with a similar name seemed appropriate.

Melanie has asked me to provide step by step instructions for making this quilt so as well as my blog I have created a separate blog the detail each step in making Lachlan's quilt.

I sew all of my quilts by hand. This includes any seams down the middle of the backing fabric, boarders, bindings and quilting.

I love the freedom that hand stitching gives. I'm not tied to a sewing machine and can take my sewing anywhere I go. I love relaxing in the evenings and sewing while I watch TV and always take something to sew with me when I go to doctors appointments.

When I was unable to use my hands because of the psoriatic arthritis I used to knot the three layers of my quilts together. I used this method on my Tumbler quilt, the 'Happiness Is' quilt and also my mother and brother Peter's quilts. As my arthritis had improved when I was sewing my Summer quilt I decided to try and quilt using a running stitch. I am now using the running stitch to quilt all my quilts.

There are many different ways of sewing quilts. Some people sew by machine, some hand stitch using a running or back stitch and others use an over' stitch with or without templates. I use cardboard templates for all of my quilts and sew use the over stitch. All of the quilts I have made using templates have been with pattern pieces that have straight edges, for example, squares, rectangles & triangles. However there is is no reason why you couldn't use the same method with curved pattern pieces such as circles.

I learnt to sew using templates sometime around 1978 when I was 16 or 17 years old. I went to a patchwork course where sewing with templates was the method everyone used. The other thing I was taught which I still use to this day is running my thread through a block of wax. The wax strengthens the cotton and also stop it tangling as much.

The first quilt I made was one for Lachlan's father Jonathon using hexagons. I still have the set of a plastic and metal template (two sizes - one for the fabric and one for the cardboard template) that I used for his quilt.

For the cardboard templates I collect greeting cards. I have a big plastic tub full of different sized cards. The cards should not be too thick as it makes it difficult to tack the fabric on to them however they need to be thick enough to hold their shape. You will also need some thicker card to use as a template for cutting the material. You can also use template plastic for your pattern templates. The pattern template for cutting material should be 1 to 1.5 cm bigger than the base pattern template.

I buy my wax blocks from a beekeeper her in Melbourne called 'Redpath's Beekeepers' however you can buy wax in a holder from Spotlight and quilting stores. I find buying the blocks from a beekeeper works out a lot cheaper than buying the ones from craft stores.


I have a collection of quilting books which I love to look through for inspiration for patterns. I find most of my patterns in the magazines. Occasionally I will see a picture of a quilt and buy the pattern but if it's a simple pattern I create the pattern myself from the picture. I did this for Hannah's Raspberries and Lime quilt.


My standard quilting supplies include:

  • a block of wax
  • Gutermann's quilters cotton - you can sew in white or cream or choose a color to match your fabrics
  • plenty of used greeting cards - various sizes
  • thick greeting cards or template plastic to cut material to size.
  • rulers - I use metal ruler and have a meter long ruler and one smaller ruler
  • scissors - one pair to cut card templates
  • scissors - one pair to cut material
  • pinking shears (optional) - I have found that when using fabric that has a tendency to fray cutting it with pinking shears helps reduce the amount of fraying.
  • quilting needles - I use Birch Big eye quilting needles size 10
  • Cotton for tacking templates - try and choose a contrasting color to your fabric
  • fabric washable marking pen or chalk
  • tracing paper
  • cutting boards
  • plastic thimble disks or any other thimble
  • quick unpick
I have three projects on the go at the moment. The 'Blue Willow' quilt which I only need to sewing the final boarder and binding, Lachlan's quilt and my Postcards from Paris quilt.

I'm trying to get as much preparation done for the Postcards from Paris and Lachlan's quilts as possible. As both of these quilts require a lot of preparation before starting I am trying to get both ready to sew while I am recuperating from my foot operation. I don't have an appointment yet, let alone a date for surgery but I am hoping that it will be in the next month or two.

I like to have two quilting projects on the go at once. One will usually be a simple project that I can take out with me or sew without needing to concentrate too much. The other project is usually one that requires me to concentrate more on what I am sewing.

Last week I started the preparation for Lachlan's quilt. I will endeavour to describe each step as I go and photograph what I am doing.